April 30, 2010

Registration opened for Capgemini at saveetha engineering college

Friends good news Registration was reopened for Capgemini at Saveetha Engineering College at Chennai,those who have missed the chance that time hurry now. Tell your friends too. All the best.


Click here to register

Another hack for Airtel browsing 2010 with OM AG Browser

Guys, we have received hell lot of requests to edit OM Browser since it had stopped working! We have heard you!
Download the new one & continue enjoying GPRS FREE!
(Link Fixed on Nov 19)
Click here to download


Previously:
AirtelGuru is back on Track with an amazing trick!
Download the special Opera Mini [OM] browser given below and start browsing + downloading free unlimited!!
Click to Download
Start enjoyin before they block this trick!

How to check the bsnl broadband Usage?

Check bsnl broadband usage using SMS http://bbusage.bsnl.in/

Please visit http://bbusage.bsnl.in/

After you rgesiter there, BSNL broadband team will send you an email stating.

Registered successfully with the following details:
Broadband User NamePhone No.Alert Mobile No.Alert Email ID.

Your request is pending for approval and will be active within 24 hours.

Get usage on-demand on your mobile phone. Send SMS to +919447051550 with the keyword BBUSAGE.
The service will be available after your above registration has been accepted.

To de-register send email to autosms@bsnl.in. from your registered mail ID.

The advantage of using the SMS facility is that bsnl portal login page to check bsnl broadband usage using the bsnl portal id for dataone might be unavailable most of the time.

How to check the bsnl booster valdity?

Many of  the bsnl customers have activated the Seconds plan booster..

And unable to check the validity of the booster.

It is very simple to check the booster valdity


Just dial *124# on your mobile phone to get the Valdity of the booster

Yahoo,Bing,Google search on the same time

Which is your default search engine - Google or Yahoo or Bing ?
Do you find answers to queries in your favorite search engine ?
Here is a cool tip for those who are still jumping around from Google to Bing to Yahoo waiting impatiently for easy answers for easy questions but tired of getting complex and weird results

Here is the site i found out called YABIGO 

Naturally on having a quick glance on logo ,
you will remember
YA - Yahoo
BI - Bing
GO - Google

What you need to do is simply search in this site , which will deliver results from the above 3 coolest search engines and that too one a single window !

What is better than seeking to have the best results in a same page for a keyword search all at once ?

Click here to go to your new search engine

April 26, 2010

An easy way to install applications and rebuilding the Laptop

Recently you bought a PC or a laptop and wished you had all your favorite softwares installed in one hit so you do not have to find the latest installer version, remember most popular softwares that you have using, download the installation, install the software etc..

I have found a great software that does all this in one simple click. As described by the software vendor - you can rebuild your PC in three easy steps

1. Pick your favorite software (s) from their website http://ninite.com/
 
2. Click "Get Installer" and run it
 
3. You're done!

The software is free to use and there is a pro version for advance features such as offline mode.

DD directplus will boom this year

Around 90 channels are waiting to join India’s free-to-air DTH platform, DD Direct Plus, operated by the public broadcaster Doordashan, according to a local report.

Online news site indiantelevision.com reported that 82 applicants with 90 channels between them are in the queue, despite the government not yet agreeing to up the capacity of the platform.

Even when the extra capacity gets the nod, DD Direct Plus will only be able to add another 38 channels, raising its capacity from 59 to 97. Broadcasters in line to add channels include NDTV, Zee and Star. Some have been waiting since March 2007 to join the platform.

Currently, many of the channels on the platform are Doordashan services including many regional feeds.

Commercial broadcasters include 9X, B4U Music, Zee’s Smile TV, Deutsche Welle’s DW TV and NHK World.

April 23, 2010

Boom Tv in SETC bus Working with the help of PXLVIEW

Imagine this, you are traveling from Chennai - Hosur in Tamil Nadu SETC bus which is playing a super hit movie Indira and bus reached Hosur when movie is about to reach climax. You get down in Hosur and board Tamil Nadu State Coporation Bus to Bangalore and you are amazed to see the movie continues here....?

This is what is happening in Tamil Nadu Governement Transport Corporation buses... They are all networked so that at a given point-of-time, all buses will be playing the same video which is almost like a satellite TV. Actually this setup also has a brand name "Boom TV" with caption "The next BIG Medium". This name comes from Build, Own, Operate and Maintain concept. Under this concept, private contractors would have to remit Rs. 262 a bus for a month for the broadcast rights and maintain the television sets and telecast the programmes

Thanks to Proxs Info for Technology, Peacock Media for OOH Idea, Airtel GPS (Platform).

All these buses are equipped with LCD Tv's connected to Windows PC's which run PxlView software. The moment this setup is switched on, Machine boots with PxlView -> Dials a predefined number through Airtel GPS modem -> Connects to PxlView Server -> Downloads the playlist which has details like which video or ad to play at what time -> Video Starts.

The LCD television with a unique inbuilt set top box would download the contents in compressed and encrypted files of MP4 and AV format while entering or halting at the wireless fidelity enabled depot. The contents can be adjusted according to the area within the stipulated time slots through GPS, which would allow local advertisement and contents to be displayed. Besides instant messages and warning could also be sent to the buses from the control room

Contractor taking up the work on BOOM concept could telecast commercial information, advertisements, road safety messages, important news items and announcements relating to public sector and government departments. The LCD plasma screens would be controlled from Chennai through GPS modem from a control room and the Government could run scroll messages of news value and government announcements. Programmes for telecast would be set every day through the GPS modem.

More info about this Product: http://www.proxsinfo.com/pxlview.php?id=1&b=1

The only disadvantage is that if you travel on Friday to Bangalore and travel back to Chennai on Sunday, you might see the same movie or video being played during both these journey :) Kind'a frustrating....

Note : This article is Not my own material and found in another website only

Boom Tv showing Angadi Theru Special Clippings

All of them who travel in Goverment buses may be get bored by  the BOOM TV.

Now the Boom Tv is coming with a good Programming schedule.

Airtel is Broadcasting this service.I think so everone know about the AIRTEL s quality of service

Now the Airtel Boom Tv is showing the Angadi theru special clippings.

It is also displaying a movie in the morning and evening session.

Comedy clippings and songs are displayed in the remaining session

Read News Paper for Free using Airtel Live

Download News Hunt From
And Read NEWS Paper In Your Language,

                                                    Use Airtellive as accesspoint

April 19, 2010

How to activate Kaspersky 2010 license using a key file ?

The latest version of Kaspersky Antivirus and Internet Security (2010) does not allow to activate your Kaspersky product using a license key file i.e. without an activation code.
The 2010 Kaspersky Lab products can be activated only by an activation code via the Internet. This becomes quite difficult if you have a valid license key file or want to Activate Kaspersky Products Offline.
Though, 2010 build don’t have the option to activate using the key file but there is a trick to do it :D

Activation Kaspersky 2010 license using key file:

1. Open your Kaspersky 2010 License Manager.

2. Click Activate New License.

3. Select Activate commercial license and enter the activation license code as T1JVS-NNMBD-K1QTN-SUBP8 (beta code).

4. Click Next. Now you’ll get a dialog box, click Ok on it.

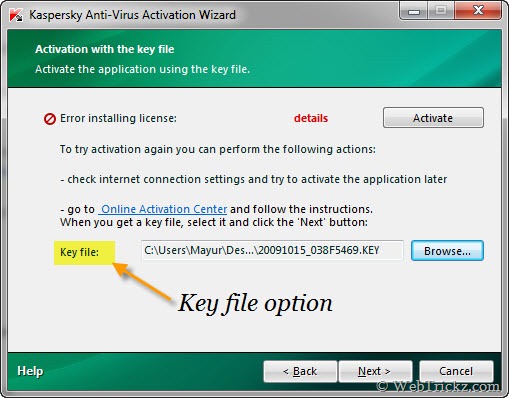
5. That’s it. Now you will see the option of a key file to activate your KAV/KIS 2010 product.


key file option in kaspersky 2010
Browse to the key location on your PC and activate your product easily.


UPDATE – Activating Kaspersky 2010 (ver 9.0.0.736) using key file.
As pointed out by some readers, the above trick does not work when activating KAV/KIS (v 9.0.0.736) with a key file. Here is a working way which lets you do this task. Follow the steps below carefully -

1. Open Kaspersky License Manager.

2. Click Activate New License (Delete any trial key first, by clicking the red X next to it).

3. Disable your internet connection (either disable Network adapter from control panel or turn off your modem/router).

4. Select Activate commercial license and enter the activation license code as T1JVS-NNMBD-K1QTN-SUBP8 or select activate trial license.

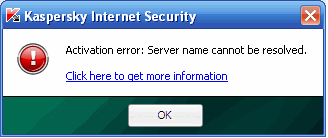
5. Click Next, an error dialog box will open as shown below:
error dialog box

6. Click Ok and you will now get the option to activate kaspersky using a key file. Browse to the key location and activate kaspersky.

If you have a Kaspersky license code and want to convert it to a license key file, for offline access then check this post:

NoteComments asking for license codes & license keys will not be approved.

Calculate the strength of your password

I think you read an article about How to Create and manage a strong password Here I introduce a site to calculate the strength of a password. Try this free web service http://www.passwordmeter.com/.

It is calculating with following factors1. Number of Characters
2. Uppercase Letters
3. Lowercase Letters
4. Numbers
5. Symbols
6. Middle Numbers or Symbols
7. Requirements

Madurai to theni a busy route for private operators

A route especially made for private bus.

No other routes will have this much no of private buses.

There are a lot of private buses in this route.

This route is always busy.

This route is also used mainly by village peoples.

This route acts as a interface for Kambam,Bodi,Theni people to reach Madurai

Madurai is just 90 km away from these village.

One of the good earning routes for buses.

Tirunelvelli to Kumuli a bus which connects the Southern side villages

Tirunelvelli to Kumuli

This route covers the following southern side villages and towns

and route of the bus is as follows

Kumuli

Bodi

Theni

Andipatti

Poochipatti

Usilampatti

T.Kallupatti
Arulmigu kalasalingam university

Srivalliputhur

Rajapalyam

Sankarankovil

Tirunelvelli


This bus is eventhough a moffusil bus . but it runs like a town bus in this route

April 18, 2010

Boom tv changed to Rider tv in setc buses

The tv broadcast in setc bus has changed from Boom tv to Rider Tv


 Eventhough they have changed the name.


There is nothing change in the programmes.


They are torturing with the same programs

April 16, 2010

9x is back on DD Direct Plus in 2010

 9X is back on DD Direct Plus DTH


9X is Back on DD Direct Plus DTH
9X Again added on DD Direct Plus DTH, Replaced the Test 301.
9X Available at DD Direct Plus in  the following T/P
Frequency – 11150
FEC – 3/4
Symbol Rate – 27500
Polarization – Vertical
About 9X : 9X is an Indian Hindi general entertainment channel based in Mumbai. It is owned by INX Media Pvt Limited. The channel was launched on November 12, 2007 in India. Launched as the flagship of the INX Network, 9X promises to provide world-class fiction and non-fiction programming and Bollywood films.
On 10 August 2009, 9X ceased broadcasting in the UK on Freesat and Sky Digital where it had been a free-to-air channel.
Official Website : http://www.9xtv.in/

Secret Codes for Nokia 2010

Codes :

1) *#06# For checking IMEI(international Mobile Equipment Identity)

2) *#7780# Reset to factory settings

3) *#0000# To view software version

4) *#2820# Bluetooth device address

5) *#746025625# Sim clock allowed status

6) #pw+1234567890+1# Shows if ur sim as any restrictions

Remove and hide Blogger Navigation bar

Under the Layout tab, click on Edit HTML tab to view the template’s HTML code.


Search for the following line of code:

]]>

Before the line, add in the following line of code:

#navbar { display: none; }

or:

#navbar-iframe { display: none !important; }
Click on SAVE TEMPLATE to make the change effective.

Hidden Programs in Windows Xp 2010

Is it strange to hear , but true that some good programs are hidden in Windows XP !!!
Programs :
1. Private Character Editor :
Used for editing fonts,etc.
** start>>Run
** Now, type eudcedit
2. Dr. Watson :
This an inbuilt windows repairing software !
** start>>Run
** Now, type drwtsn32
3. Media Player 5.1 :
Even if you upgrade your Media Player, you can still access your old player in case the new one fails !!!
** start>>Run
** Now, type mplay32
4. iExpress :
Used to create SetupsYou can create your own installers !
** start>>Run
** Now, type iexpress

April 9, 2010

How To Choose A Good Domain Name?

http://www.dn-trade.com/img/domain-name-trading.gif Choosing a domain name for your site is one of the most important steps towards creating the perfect internet presence. If you run an on-line business, picking a name that will be marketable and achieve success in search engine placement is paramount. Many factors must be considered when choosing a good domain name. This article summarizes all the different things to consider before making that final registration step!


Short and Sweet

Domain names can be really long or really short (1 - 67 characters). In general, it is far better to choose a domain name that is short in length. The shorter your domain name, the easier it will be for people remember. Remembering a domain name is very important from a marketability perspective. As visitors reach your site and enjoy using it, they will likely tell people about it. And those people may tell others, etc. As with any business, word of mouth is the most powerful marketing tool to drive traffic to your site (and it's free too!). If your site is long and difficult to pronounce, people will not remember the name of the site and unless they bookmark the link, they may never return.


Consider Alternatives


Unless a visitor reaches your site through a bookmark or a link from another site, they have typed in your domain name. Most people on the internet are terrible typists and misspell words constantly. If your domain name is easy to misspell, you should think about alternate domain names to purchase. For example, if your site will be called "MikesTools.com", you should also consider buying "MikeTools.com" and "MikeTool.com". You should also secure the different top level domain names besides the one you will use for marketing purposes ("MikesTools.net", "MikesTools.org", etc.) You should also check to see if there are existing sites based on the misspelled version of the domain name you are considering. "MikesTools.com" may be available, but "MikesTool.com" may be home to a graphic pornography site. You would hate for a visitor to walk away thinking you were hosting something they did not expect.

Also consider domain names that may not include the name of your company, but rather what your company provides. For example, if the name of your company is Mike's Tools, you may want to consider domain names that target what you sell. For example: "buyhammers.com" or "hammer-and-nail.com". Even though these example alternative domain names do not include the name of your company, it provides an avenue for visitors from your target markets. Remember that you can own multiple domain names, all of which can point to a single domain. For example, you could register "buyhammers.com", "hammer-and-nail.com", and "mikestools.com" and have "buyhammers.com" and "hammer-and-nail.com" point to "mikestools.com".


Hyphens: Your Friend and Enemy

Domain name availability has become more and more scant over the years. Many single word domain names have been scooped up which it makes it more and more difficult to find a domain name that you like and is available. When selecting a domain name, you have the option of including hyphens as part of the name. Hyphens help because it allows you to clearly separate multiple words in a domain name, making it less likely that a person will accidentally misspell the name. For example, people are more likely to misspell "domainnamecenter.com" than they are "domain-name-center.com". Having words crunched together makes it hard on the eyes, increasing the likelihood of a misspelling. On the other hand, hyphens make your domain name longer. The longer the domain name, the easier it is for people to forget it altogether. Also, if someone recommends a site to someone else, they may forget to mention that each word in the domain name is separated by a hyphen. If do you choose to leverage hyphens, limit the number of words between the hyphens to three. Another advantage to using hyphens is that search engines are able to pick up each unique word in the domain name as key words, thus helping to make your site more visible in search engine results.


Dot What?

There are many top level domain names available today including .com, .net, .org, and .biz. In most cases, the more unusual the top level domain, the more available domain names are available. However, the .com top level domain is far and away the most commonly used domain on the internet, driven by the fact that it was the first domain extension put to use commercially and has received incredible media attention. If you cannot lay your hands on a .com domain name, look for a .net domain name, which is the second most commercially popular domain name extension.


Long Arm of the Law


Be very careful not to register domain names that include trademarked names. Although internet domain name law disputes are tricky and have few cases in existence, the risk of a legal battle is not a risk worth taking. Even if you believe your domain name is untouchable by a business that has trademarked a name, do not take the chance: the cost of litigation is extremely high and unless you have deep pockets you will not likely have the resources to defend yourself in a court of law. Even stay away from domain names in which part of the name is trademarked: the risks are the same.


Search Engines and Directories

All search engines and directories are different. Each has a unique process for being part of the results or directory listing and each has a different way of sorting and listing domain names. Search engines and directories are the most important on-line marketing channel, so consider how your domain name choice affects site placement before you register the domain. Most directories simply list links to home pages in alphabetical order. If possible, choose a domain name with a letter of the alphabet near the beginning ("a" or "b"). For example, "aardvark-pest-control.com" will come way above "joes-pest-control.com". However, check the directories before you choose a domain name. You may find that the directories you would like be in are already cluttered with domain names beginning with the letter "a". Search engines scan websites and sort results based on key words. Key words are words that a person visiting a search engine actually search on. Having key words as part of your domain name can help you get better results.

April 7, 2010

Orkut Profile Shaking JavaScript

There are hundreds of JavaScript tricks for Orkut. However when I started researching on it, I found that most of the tricks available on internet do not work or they are malicious.
However, I did find some good scripts. Also, I developed some new scripts. I will be posting more about these scripts soon.
The first script in this series is the Profile Shaking JavaScript. It simply shakes your Orkut Profile like an earthquake inside your browser :)
To try this, open your orkut profile page in browser. Now copy the following JavaScript code,
javascript:function flood(n) {if (self.moveBy) {for (i = 35; i > 0; i–) {for (j = n; j > 0; j–) {self.moveBy(1,i);self.moveBy(i,0);self.moveBy(0,-i);self.moveBy(-i,0); } } }} flood(10);
Paste this code in the browser’s address bar and press Enter. Your profile will start shaking immediately.
Also, if you see the last line of the code, there’s a function call,
flood(10);
This statement determine the number of seconds that the effect should last. If you want it to continue for some more time, then change 10 to 60, and it will shake your profile for 1 minute (60 seconds).
Note that your browser should be JavaScript enabled for this effect to work.
Its really funny. Enjoy!

Top 10 Facebook Hacks 2010

You all know that we are celebrating the month of September as the Anniversary month of Hacking Truths. As per the promise made by us that this month is going to be special and so here we are with the first gift to all of you.
Facebook has become very famous in last 1 year. Orkut which was considered to be the best Social networking website has been sidetracked by emerging Social Networking Websites like Facebook and Twitter. Considering the popularity of Facebook we have collected the Most Essential Hacks of Facebook and presented them to you.

1.How to View the Album of Any User Even if it is Private

You can use this script to view a photo in the original album, even if you’re not friends with the person.
Get it Here

2. How to Remove Annoying Facebook Advertisement

Get rid of some of the Facebook advertising and sponsored by sections with this tool.
Get it Here

3. How to see Real Profiles from Public Pages

This script redirects to real profiles from the Facebook people pages (public profiles). There is a risk of an infinite redirect loop if not logged in, so be logged in.
Get it Here

4. How to Undo Facebook Changes

If you hate some or all of the new Facebook changes, undo them with these scripts and use what you liked previously.
Get it Here

5. How to View All the Photos from a Person

You can search for pictures of a Facebook member who has tight privacy settings and view all his/ her pictures without his/ her consent.
Get it Here

6. How to Find More Friends at Facebook

Suppose some of your friends have newly joined Facebook and you didn’t even knew. Use this script and it will help you go through your friends’ friends list and find them out.
Get it Here

7. How to Share Files from Facebook

With this box widget, you can share files from your computer through Facebook. Isn’t it great?
Get it Here

8. How to Get a Job from Facebook

Looking for a job? This application gives Facebook users unique access to job information, networking opportunities and other career resources.
Get it Here

9. How to Tighten up the Privacy and still Maintain Communication Convenience

The Private Wall combines the best of both worlds of Facebook: online convenience and communication with more serious privacy settings.
Get it Here

10 How to Cheat Facebook Texas Hold em Poker

This is one of my Favorite hacks and that is why I have saved it for the last one. Using this software you can see the cards of any player and the advanced version of this software allows you to even add credits to your account for free.
Get it Here

April 6, 2010

Wamp server is best for Php begineers

Wamp server is the best one for the php begginners

Those Who are going to start work on php platform learn php with help of Wampp


It will save you the time in the begining .


So use Wampp in Windows xp


In case of linux use Xampp

It will help u a lot better

Please be careful .

Because i lost my time for configuring xampp .

Instead if i used the Wampp

I could have learn the php quickly .

Download Wampp from here

Download Xampp from here

Teashark hack for Mobile phones Which support midp 2.0

ote: New Proxies for free Airtel GPRS have been posted here.
After a Lot of research we have found another hack for free Unlimited GPRS for Airtel live users. The new trick for Airtel free internet is as simple as installing a software on your Cell phone. Actually the trick is to install a Mobile Web Browser called Teashark or Ucweb on your Cellphone.
Follow the steps below for unlimited mobile browsing.
1. Download Teashark browser(for MIDP 2.0 handsets only) from here or from wap.teashark.com if you are using mobile browser.
2. Install the browser and select Airtel Live as the access point and start browsing absolutely free (Don’t worry airtel won’t charge you).
Note: If Teashark browser doesn’t work then go for Ucweb browser which can be downloaded from here. They also have many features like built-in download manager,search function,email service and also page saving options.

Google Talk Cheat Sheet 2010


While holding the control key, move the scroll wheel on your mouse either up or down. This trick works while being focused in either the read or write area.
2. Insert line breaks
If you want to have a message that spans multiple paragraphs, just hold shift and hit enter. You can add as many new lines as you want to create.
3. Bold Text
To write something bold, you can use an asterisk before and after the word. For Example *Hungry Hacker*
4. Italic Text
To use italics, use an underscore before and after the word. For Example _Hungry Hacker_
5. Switch windows
Hitting tab will cycle through open windows. It will select minimized conversations, to expand them just hit enter. If you just want to cycle through IM’s and don’t care about the buddy list, control-tab will do that and will automatically expand a minimized conversation if you settle on one.
6. Invitation Tips
You don’t need to say Yes or No when someone wants to add you as a friend; you can simply ignore it, the request will go away. (On the other hand, someone with whom you chat often will automatically turn to be your friend, unless you disable this in the options).
7. Show Hyperlinks
You can show your homepage or blog URL simply by entering it in your away message (at the top of the main window). It will automatically turn to a link visible to others.

How To’s

1. Use multiple identities on Google Talk
Want to run Google Talk with multiple Gmail identities? If you have several Google Gmail accounts you also may want to run multiple instances of Google Talk This is especially important for families that share a single PC. Basically, to have “Google Polygamy” you need to run Google Talk with the following switch: /nomutex
  • Right-click on the desktop
  • Select New -> Shortcut
  • Paste the following into the Address box:
“C:\program files\google\google talk\googletalk.exe” /nomutex
  • Click Next and choose a shortcut name such as Google Talk1, Google Talk2, or something related to your Gmail account for easy remembering which account is which.

2. Use Google Talk via a Web Browser
You want to use Google Talk anywhere ? Follow these guidelines :)
  • Opens your favourite web browser.
  • Go to following Website
http://www.webjabber.net:8080/jim/
  • Follow the instructions of the Page.
  • You can talk with your friends

3. Conference Calls
  • Open up a copy of Google Talk on all computers with which you wish to conference.
  • After one copy is opened make a new shortcut for Google Talk but at the end of it add /nomutex.
  • If you installed it to the default folder then your shortcut should read “C:\Program Files\Google\Google Talk\googletalk.exe” /nomutex.
  • Open 2nd instances of the software on every user’s computer.
  • After this start a chain: User 1 should connect on one instance to user 2. User 2 will connect on his second instance to user 3. User 3 will connect using his second instance back to user 1. With this chain everyone is connected to everyone.
4. Change Nickname
You can’t change your nickname in a way that other people will see it change. Every nickname in the Google Talk Contact List is the part that is before @gmail.com (only the alphabetical characters are used) or the name you chosen for your GMail account. To change the nickname you need to do the following:
  • Go to your Gmail account and change the name there.
  • Choose Settings, Accounts, and then Edit info. Click on the second radio button, and enter your custom name.
  • As a result all of your emails will have that nick as well, there is no way to seperate the two.
  • You can add a website in your custom message, it will be clickable when someone opens a conversation window with you.

5. Contacts
You don’t need to say Yes or No when someone wants to add you as a friend; you can simply ignore it, the request will go away. (On the other hand, someone with whom you chat often will automatically turn to be your friend, unless you disable this).

6. Play Music
It’s possible to broadcast music, MP3, etc. through Google Talk. Follow the steps given bellow:
  • Unplug your microphone.
  • Double click on the speaker icon in the lower right corner. This will open up “Volume Control”.
  • Select “Options” and then “Properties”. Then check the button next to “Recording” then click OK.
  • You may also have to change your setting under Mixer Device. Now the Recording Control screen should be up.
  • On my computer I selected “Wave Out Mix”. Click on the green phone in Google Talk and call your friend.

Registry Hacks

Before applying any of these Registry Tweaks follow the steps given below:
  1. Backup your Registry
  2. Start -> Run -> Regedit
  3. Now Navigate to the following directory
  4. HKEY_CURRENT_USER\Software\Google\Google Talk.
  5. Make Changes based on the info given bellow.
  6. Restart your PC for the changes to take effect.
The “Google/Google Talk” key has several sub-keys that hold different option values:
Accounts: This one has subkeys for each different account that has logged in on the client. These keys have different values that store the username, password and connection options.

Autoupdate
: Stores the current version information. When the client checks for updates it compares Google’s response with these values. If an update is needed, it will download and update the new version.
Options: This is the most interesting part, where most of the current hacks should be used (keep reading).
Process: Stores the process ID. Probably used by Google Talk to detect if it’s already running or not.
  1. HKEY_CURRENT_USER\Software\Google\Google Talk\Options\show_pin
  2. If 1, shows a “pin” next to the minimize button that keeps the windows on top of all the other open windows when clicked.
  3. HKEY_CURRENT_USER\Software\Google\Google Talk\Options\view_show_taskbutton
  4. If 0, hides the taskbar button, and leaves the tray icon only, when the window is shown
  5. HKEY_CURRENT_USER\Software\Google\Google Talk\Options\away_inactive
  6. If 1, status will be set as Away after the specified number of minutes.
  7. HKEY_CURRENT_USER\Software\Google\Google Talk\Options\away_screensaver
  8. If 1, status will be set as Away after the specified number of minutes.
  9. HKEY_CURRENT_USER\Software\Google\Google Talk\Options\inactive_minutes
  10. Number of inactive minutes to become away if auto-away is on.

Keyboard Shortcuts

Shortcut Use
Ctrl + E It centralizes the selected text, or the current line.
Ctrl + R It justifies to the right the selected text, or the current line.
Ctrl + L It justifies to the left the selected text, or the current line.
Ctrl + I The same thing does that Tab.
Tab It is giving the area to each of the windows opened by Google Talk.
Ctrl + Tab The same thing does that Tab but in reverse.
Shift + Tab The same thing that Ctrl + Tab does.
Ctrl + Shift + L Switch between points, numbers, letters, capital letters, roman numbers and capital roman numbers
Ctrl + 1 (Key Pad) It does a simple space between the lines.
Ctrl + 2 (Key Pad) It does a double space between the lines.
Ctrl + 5 (Key Pad) A space does 1.5 between the lines.
Ctrl + 1 (Num Pad) It goes at the end of the last line.
Ctrl + 7 (Num Pad) It goes at the begin of the last line.
Ctrl + F4 It closes the current window.
Alt + F4 It closes the current window.
Alt + Esc It Minimize all the windows.
Windows + ESC Open Google Talk (if it’s minimized, or in the tray)
F9 Open Gmail to send an email to the current contact.
F11 It initiates a telephonic call with your friend.
F12 It cancels a telephonic call.
Esc It closes the current window.

Google’s Secret Command-Line Parameters

There are a few secret parameters you can add to Google Talk and make it function differently.
You can use these parameters as follows:
“C:\program files\google\google talk\googletalk.exe” [PARAMETER]
Parameter Use
/nomutex Allows you to open more than one instance of Google Talk
/autostart It will check the registry settings to see if it needs to be started or not. If the “Start automatically with Windows” option is unchecked, it won’t start.
/forcestart Same as /autostart, but forces it to start no matter what option was set.
/S upgrade Used when upgrading Google Talk
/register Registers Google Talk in the registry, includig the GMail Compose method.
/checkupdate Check for newer versions.
/plaintextauth Uses plain authentication mechanism instead of Google’s GAIA mechanism. Used for testing the plain method on Google’s servers.
/nogaiaauth Disables GAIA authentication method. The same as /plaintextauth .
/factoryreset Set settings back to default.
/gaiaserver servername.com Uses a different GAIA server to connect to Google Talk. Used for debug purposes only, there are no other known GAIA servers.
/mailto email@host.com Send an email with Gmail.
/diag Start Google Talk in diagnostic mode.
/log Probably has something to do with the diagnostic logging

Miscellaneous G-talk Facts

  • A message can be 32767 characters long.
  • The Gmail account ‘user@gmail.com’ can’t be invited as your friend

Gmail Account hacking tool 2010

A tool that automatically steals IDs of non-encrypted sessions and breaks into Google Mail accounts has been presented at the Defcon hackers’ conference in Las Vegas.
Last week Google introduced a new feature in Gmail that allows users to permanently switch on SSL and use it for every action involving Gmail, and not only, authentication. Users who did not turn it on now have a serious reason to do so as Mike Perry, the reverse engineer from San Francisco who developed the tool is planning to release it in two weeks.
When you log in to Gmail the website sends a cookie (a text file) containing your session ID to the browser. This file makes it possible for the website to know that you are authenticated and keep you logged in for two weeks, unless you manually hit the sign out button. When you hit sign out this cookie is cleared.
Even though when you log in, Gmail forces the authentication over SSL (Secure Socket Layer), you are not secure because it reverts back to a regular unencrypted connection after the authentication is done. According to Google this behavior was chosen because of low-bandwidth users, as SLL connections are slower.
The problem lies with the fact that every time you access anything on Gmail, even an image, your browser also sends your cookie to the website. This makes it possible for an attacker sniffing traffic on the network to insert an image served from http://mail.google.com and force your browser to send the cookie file, thus getting your session ID. Once this happens the attacker can log in to the account without the need of a password. People checking their e-mail from public wireless hotspots are obviously more likely to get attacked than the ones using secure wired networks. Todd Mumford, from the SEO company called SEO Visions Inc, states “This can be a serious problem for Internet Marketers who travel often and use their wireless laptops and Gmal services often and do not always have access to a secure connection”
Perry mentioned that he notified Google about this situation over a year ago and even though eventually it made this option available, he is not happy with the lack of information. “Google did not explain why using this new feature was so important” he said. He continued and explained the implications of not informing the users, “This gives people who routinely log in to Gmail beginning with an https:// session a false sense of security, because they think they’re secure but they’re really not.”
If you are logging in to your Gmail account from different locations and you would like to benefit from this option only when you are using unsecured networks, you can force it by manually typing https://mail.google.com before you log in. This will access the SSL version of Gmail and it will be persistent over your entire session and not only during authentication.

How to Hack Gmail or Yahoo or Hotmail or Any Other( New Version)


hhttp://blogoscoped.com/files/google-apps-hacks-cover.jpgIn the previous version of “” One problem faced was that whenever the victim clicks on login a message would come saying “This page will send your information through email” which could sometime fail your hack. But in this new version this problem is eliminated and this is has become more fullproof than the previous version.
First of all you need to create an account in a form handling service. In the registration form enter your email address in the field “Where to send Data” and in redirect enter the URL of the site whose account is to be hacked( For Yahoo it will be http://mail.yahoo.com and for google it is mail.google.com/mail). After registering you will get an email from the web form designer with your form id.
Now follow the following steps :
  1. Open the website of HotMail or GMail or YahooMail, its your wish. If you want to HACK yahoo id, then goto www.yahoomail.com
  2. Now press “CTRL+U”, you will get the source code of yahoo page. NOw press “CTRL+A” copy all the text.
  3. Open NOTEPAD, now paste it here. SAVE it as YAHOOFAKE.HTML
  4. Now open the the file yahoofake.html using noepad, here you ll find a code which starts with
    ( This code is for Yahoo. For any other site this code will be different but you need to find the code starting with (form method=”post” action=”xxxxxxxxxxxxx”))
  5. Now in place of (form method=”post” action=”xxxxxxxxxxxxx”)
    put the following code after placing your form id:

Now Save the yahoofake.html.
To hack the victim’s password and username the victim has to login through this page. Many people had sent me queries about how to make someone login through your link in the previous version. I have the solution for that also.
First of all upload your page using some free webhosting services. Tip: Register to those webhost which don’t give their own ads and which gives URL of type “your site name.webhost.com”.
Now select your site name as mail.yahoo.com/support. You can also add some rubbish numbers and make is very long so that the victim does not see the name of webhost in the link.
Now send a fake mail from support_yahoo@yahoo.com to the victim’s email address with subject ” Account Frozen” and in the mail write that Due to some technical errors in yahoo we need you to login through this link otherwise your account will be frozen.
After reading this your victim will click and login through the page you created and as you have give the redirection URL as the URL of the site itself so it will goto the login page again and the victim will think that he might have given wrong password so the page came again but in reallity the username and password has been sent to your email account you specified and the victim is still not knowing that his account is hacked.
If you have your own ideas plz write it as comment to this post. Your participation is always appreciated. Good Luck !

How to Install any linux on usb

 I got this article from the hungry hackers.com

It seems so quite intersting try this. 


There are so many reasons why having a Linux distribution on a USB drive can come in handy. From having a “rescue” OS on your keyring to being able to install a new distribution on your EeePC, a “thumb drive” Linux has many uses. But getting Linux onto a USB drive can’t be simple. Right? Wrong. There is a tool, UNetbootin, that makes installing Linux
on a USB drive simple.
UNetbootin can be used on either Linux or Windows. In this article, we’ll be illustrating it for Both.
Note: Not all USB installations will work on all machines. This can be an issue with your BIOS or your USB drive. If you install an OS that doesn’t work, try another. But after all that work, you might wind up with a machine that simply won’t boot from a USB drive. You have been warned.

Using UNetbootin with Linux

  1. The first thing to do is download a copy of UNetbootin. For our purposes we’ll download the Linux universal install binary (named unetbootin-linux-299). Once that has finished you will need to issue the Following command in order to make the file executable.
    chmod u+x unetbootin-linux29
  2. Once the file is executable issue the following command (from the same directory unetbootin-linx-299 is stored) to see the application running.
    su ./unetbootin-linux-299
  3. But you’re not ready just yet. Depending upon your distribution, you might come across an error involving p7zip-full. This might be in your distribution’s repositories. If you use Mandriva you can install p7zip but you will not have the full package. If you use Ubuntu you can get p7zip-full with the following command
    apt-get install p7zip-full
  4. Before you run the application you will need to insert and mount your usb drive. Stick in your usb drive and then issue the following command to find out where your usb drive is located.
    dmesg
  5. Mount that and then issue the following command. When you issue the command you will see the UNetbootin window.
    su ./unetbootin-linux-299

April 4, 2010

How to install WAMPP

Configuring Your Home Computer to Run Apache Server, PHP, MySQL, ColdFusion, and IIS
This tutorial for installing WAMP Server (Apache, PHP, MySQL, and phpMyAdmin) was written for the students in the Web Page Design program at the Contra Costa ROP. This tutorial will cover basic server installation for web development testing purposes on your home computer. This tutorial will not cover all of the necessary security settings used to create a public web server.
We currently use three texts for web database development:
Macromedia Dreamweaver MX 2004 - ISBN 0-619-21420-1 - Covers Dreamweaver from the ground up. This text also includes an introduction to web database development using PHP/MySQL and ASP/Access. This book is required for all students in the program.
Dreamweaver MX 2004 with ASP, Coldfusion, and PHP - ISBN 0-321-24157-6 - Covers some basic Dreamweaver functions, but the reader should have some prior experience using Dreamweaver to fully comprehend the text. Students can learn the basics of three different scripting languages, PHP/MySQL, ASP/Access, and Coldfusion/Access, by completing this book. Elective course.
Sams Teach Yourself PHP, MySQL, and Apache - ISBN 0-672-32489-X - For students who would like to learn how to hand-code PHP/MySQL applications. Elective course.

Definition of Terms

PHP: Hypertext Preprocessor is a scripting language that is embedded in HTML. PHP scripting code is frequently used to connect web pages to MySQL databases to create dynamic web sites. Some popular examples of PHP driven web sites would be blogs, message boards, and Wikis. PHP files are actually plain text files; they can be created in TextPad or any other Plain Text Editor. In a text editor set the Save As type to text and save the file with a .php extension.  Note:  You must type the .php yourself.  PHP files can also be created with Dreamweaver MX 2004. PHP is "open source" and therefore free. We use the Apache Server to work with PHP files in the classroom.
MySQL is a relational database system. MySQL uses "Structured Query Language" which is the most common database language. It is the most popular "open source" database in the World. MySQL content can be managed via a command line or a web interface. MySQL is "open source" and therefore free. We use the Apache Server to work with MySQL files in the classroom.
Coldfusion is another scripting language used to connect to databases. It performs essentially the same functions as PHP, but it is produced by Macromedia. There is a free developer edition of Coldfusion available on Macromedia's web site. We use the Apache Server to work with Coldfusion files in the classroom.
phpMyAdmin is a popular PHP driven web interface that allows you to manage your MySQL database content via a web form. It is much easier to learn to use phpMyAdmin to manage your MySQL database content than it is to edit it from the command line. phpMyAdmin is "open source" and therefore free.
Apache is a popular web server that many ISP's and individuals use to host web pages.  When you install Apache on your system your machine becomes a web server.  Pages stored on your system in a "special folder" are accessible on the Internet via the machine's IP address. In order for pages to be viewed on the Internet, the files must be stored in a special directory; this directory is usually called htdocs, public_html, or www.  If you use a web host, you probably upload your files to a directory with one of these names. If someone else wants to access your web pages, they must know the IP Address of your machine, i.e., 179.199.9.100.  Apache is "open source" and therefore free.
IIS or Internet Information Server is Microsoft's web server. It performs the same functions as Apache and is used with ASP and Access files primarily, but it can also run PHP and MySQL. It can be installed on Windows based machines (Windows 2000, Windows XP, etc.). IIS is available on the Windows installation CD. Typically you will install Apache or IIS; both servers services should not be running on your machine at the same time. IIS is needed to run ASP/Access applications.
Windows Services are used to run these servers and modules. Once services are installed they can be started and stopped via Start > Control Panel > Administrative Tools (switch to classic view if you do not see the Administrative tools) > Services. These Services can be configured to automatically start or to be started manually. The Apache Service and the IIS service should not run at the same time. This will be discussed in more detail later in the tutorial.

PHP and Coldfusion Testing Requirements

In order to test PHP and Coldfusion pages you must have Apache, MySQL, and the PHP and/or Coldfusion module installed on your own computer or have a host that supports PHP or Coldfusion. You can use your f2o.org account, but it is much easier to test your PHP pages on your local machine.  If you do not have these modules installed, you would have to upload your PHP pages to your ISP to view them.  The beauty of Apache, MySQL, and PHP is that they're free. If you are working in the classroom and you are creating PHP web pages, you must start the Apache Web Server at the beginning of class each day. 

WAMP5 Server Setup

Apache, MySQL and PHP are already installed on our systems. We are using a free server bundle called WAMP5 for Windows which includes Apache, MySQL, PHP, and phpMyAdmin.  It is very easy to install and it can be obtained from the WAMPServer home page. While you can install Apache, MySQL, and PHP as separate modules, it is much easier to install the WAMPServer bundle. If you have never worked with server software than I would definitely recommend using the WAMP bundle. If you want to work at home, follow these steps to install WAMP5 on your home system.  Note: Please do not install WAMP on the classroom systems.

Installing WAMP5 Server

You can download a free copy of the WAMP5 Server from the WAMP Server home page. Download the most recent version of the server into a folder on your hard drive. The file name will be similar to wamp5_1.43.exe. Locate the downloaded file and double click the file to launch the installation.
The WAMP5 Setup Wizard will appear. Click Next.
WAMP Setup Welcome Screen
The License Agreement screen will appear - Accept the agreement and click Next.
WAMP License Screen
At the Select Destination Location you can change the install directory. The default is C:\wamp. We use the default directory in the classroom. Click Next.
WAMP Directory Screen
Select the Start Menu Folder. We use the default WampServer folder in the classroom. Click Next.
Shortcut location
You can set WAMP to automatically start each time Windows start. I would recommend that you do not check this option. This could cause security issues on your home computer if you were to leave the server running whenever the computer is turned on. You should manually start your WAMP/Apache server when you need it. Click Next.
WAMP Startup
At the Ready to Install screen, click Next.
Confirm Installation Settings
The Installing screen will appear indicating the installation process.
Installing WAMP Progress
You will need to select the default publishing folder or DocumentRoot folder. This is the folder that you store your web site in. Any files that are placed in this folder will be available on the Internet by typing in the IP address of the machine. You will use this folder as the Testing Server Folder when you are working in Dreamweaver. The path to the folder is C:\wamp\www. Click OK. On a web host you usually store your files in a folder called www or public_html; this procedure is setting up that storage folder.
Select Server Directory
At this screen you will select your default web browser. In the classroom we have left Internet Explorer as the default browser. No changes were made to this screen. If you prefer to use another browser like Firefox or Opera you will have to navigate to the executable *.exe file of the browser. Click Open.
Select the default browser
If necessary, check Launch WAMP5 now and click Finish to complete the Installation.
WAMP Installation Completed
The installation is complete and the WAMPServer will Start.
WAMP5 Server Menu
This will launch Apache, PHP, and MySQL. A new icon will appear in the task bar WAMP Taskbar Icon to the left of the clock.  When you click the WAMP menu icon WAMP Taskbar Icon a menu will appear.  From the Wamp Menu you can start and stop the server (Start All Services or Stop All Services) on your machine and you can administer the MySQL databases with phpMyAdmin. This will be covered in greater detail later in the lesson. 
To start the server at home, click Start > All Programs > WampServer > Start WampServer. Click the WAMP5 Server icon WAMP Taskbar Icon in the task bar and select Start All Services.
In the classroom you will need to click Start > All Programs > Web Design > WampServer > Start WampServer to start Apache, PHP, Coldfusion. Click the WAMP5 Server icon WAMP Taskbar Icon in the task bar and select Start All Services.

Setting a MySQL Password

Note: We have already configured WAMP in our classroom, please do not change the passwords, users, or configuration files.
Once you get WAMP5 installed, you will want to change the MySQL password. When you first install WAMP5 passwords are not set. If you do not password protect your MySQL tables your are leaving your machine open to hackers. You can change the password by clicking the WAMP5 Server icon WAMP Taskbar Icon in the task bar and selecting phpMyAdmin. This will launch Internet Explorer and the phpMyAdmin web interface. Locate the Privileges link and change the Privileges as directed in this Password FAQ. You will want to be sure to change the 'root' password.
After you change the MySQL password you will have to edit the config.inc.php file typically located in C:\wamp\www\phpmyadmin. Open this file with a text editor and scroll to approximately line 85. The code should look something like this:
Config.inc.php file line 85
You will need to type your new password between the two single quotes as directed in the above image. Do not delete the quotes.

Setup PHP E-mail

Note: We have already configured WAMP in our classroom, please do not change the passwords, users, or configuration files.
The php.ini file, located in C:\wamp\apache, is used to configure the PHP module. A text editor can be used to edit the php.ini file.
In order to test mail functions on your PHP pages you will need to configure the mail function in the php.ini file so that you can send e-mail. Click the WAMP5 icon WAMP icon and select Config Files > php.ini. Look for the [mail function] section of the file located around line 594. You will need to know the SMTP address (used to send e-mail) of your Internet Service Provider. This would be the same address that you use in Outlook or Outlook Express as your SMTP server. The SMTP address uses a format similar to this mail.yourwebhost.com, smtp.yourwebhost.com, or pop.yourwebhost.com. You will also need to type your e-mail address after the equal sign in the sendmail_from line.
[mail function]
; For Win32 only.
SMTP = mail.yourwebhost.com
; For Win32 only.
;sendmail_from = youremailaddress@yourhost.com
My new Sony Ericson Mobile 2010

http://www.letsgomobile.org/images/news/sonyericsson/sony-ericsson-naite-test.jpgMy new mobile after my N70.
It sounds betters but not best than my Nokia N70. I love this mobile for the Clarity and the Fast browsing


I had got a news that the mobile is ecofriendly .

I  dont know how it act  as ecofriendly .

It is very handy to handle.

Very intersting to message from this cellphone

Till now i am searching for extra features about this mobile .

But this mobile sounds quite intersting